Since owning a wood fired oven the way I have monitored temperature has changed.
From the first firings of the oven and using no temperature measurement, but instead is it cooked to, oh no its burning.
Moved on to using a cheap and cheerful infra red thermometer. Which was good for pizza and getting a good idea of the overall temperature of the oven.
Last year I bought a Weber instant read thermometer so I can monitor inside a cooking joint. Which was a revelation, getting up at 4am Christmas morning, I opened the door on the wood fired oven and plunged the thermometer into the gammon. It read at a perfect cooked temperature, put cooked gammon in kitchen and went back to bed. No more uncovering the gammon cutting into it to see if it was cooked, recovering putting back in the oven. Only to check again later.
It is so much easier to keep an eye on when cooking a joint of meat. Well worth the spend and we use it in the kitchen as much as with the wood fired oven.
But there must be a better/lasier way of doing this without messing about with the cooking joint too much. I.e. knowing when its cooked, then taking it out of the oven.
Their are loads of BBQ wireless monitors on the market, but they all seem to require regular replacing of the monitor cables and with it being used in and out of the wood fired oven. I was not sure how long these would last. So I decided to make my own version which can be adapted to what I want it to do.

Equipment Used
Wemos® ESP32 OLED Module For Arduino ESP32 OLED WiFi + Bluetooth OLED Module

Smokehouse penetration probe - stainless armoured or braided lead - probe type : type K, lead style : armoured
A really nice meat probe with armoured cable from ETI.

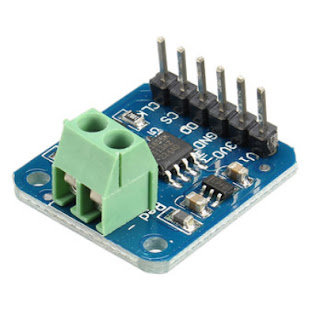
MAX31855 K Type Thermocouple Breakout Board Temperature Measurement Module For Arduino You can get these a lot cheaper but they only seem to have the MAX31855 not the other components required so be careful. Also bear in mind that the IC costs £5 so a board for $2 is probably a grey market IC.
The three parts were soldered together as below
 picture of gizmo and probe


The wemos board was programmed using the arduino ide which I am use to using - there are a few good tutorials on how to do this see here for more info
What this little gizmo gives me is a wireless meat thermometer, using wifi it connects to my home wifi. I can use a webpage on my network to monitor the temperature of the meat cooking outside in my wood fired oven.
If I am outside near the wood fired oven the oled display shows the current temperature.
The webpage display of the temperature also shows ideal meat cooking temperatures as a reference. I like a webpage because I can use it on any device - phone, tablet, pc etc

What makes this so interesting to me is its configurable, it can be altered to do almost anything. it could even be setup to email you when the meat is done.
Thing Still to do
a 3d printed case
more tweaking of the software to make it more professional looking
also needs to be able to cope with not finding a network and display ip address on the oled display.
splash screen on startup, standalone access point so not reliant on a network etc.
Log to mysql for graphing of data
******* CURRENT CODE BELOW ********
/*
The MAX31855 uses SPI to communicate, and requires 3 pins. This example displays the junction
(chip) temperature and the thermocouple temperature.
readJunction() and readThermocouple() will return the temperature, or one of these errors:
#define FAULT_OPEN 10000 // No thermocouple
#define FAULT_SHORT_GND 10001 // Thermocouple short to ground
#define FAULT_SHORT_VCC 10002 // Thermocouple short to VCC
#define NO_MAX31855 10003 // MAX31855 not communicating /*
#include <WiFi.h>
const char* ssid = "YOURSSID"; // Change to your network ssid
const char* password = "YOURPASSWORD"; // Change to your network password
WiFiServer server(80); // Creates a webserver on port 80
#include <MAX31855.h> // Libabrary for reading MAX31855 K-Type thermocouple
// For a connection via I2C using Wire include
#include <Wire.h> // Only needed for Arduino 1.6.5 and earlier
#include "SSD1306.h" // alias for `#include "SSD1306Wire.h"`
// Initialize the OLED display using Wire library
SSD1306 display(0x3c, 5, 4); // 5, 4 are for the Wemos® ESP32 OLED Module connection pins of the display
// Pin connections for MAX31855
#define MISO 26 // Data Pin
#define SCK 25 // Clock Pin
#define CS 16 // CS Pin
int tempC=0; // Intialize a variable for temperature
// Create the temperature object, defining the pins used for communication
MAX31855 temp(MISO, CS, SCK); //
void setup() {
Serial.begin(115200); // Start serial output for debug information at 115200k
// Initialising the UI will init the display too.
display.init();
display.flipScreenVertically();
display.setFont(ArialMT_Plain_24); // Set display font and size
// pinMode(5, OUTPUT); // set the LED pin mode
delay(10); // 10ms pause
// We start by connecting to a WiFi network and displaying results via serial output
Serial.println();
Serial.println();
Serial.print("Connecting to ");
Serial.println(ssid);
WiFi.begin(ssid, password); // Connect to network via wifi using credentials from above
// while not connected to network delay then spit out . on serial port
while (WiFi.status() != WL_CONNECTED) {
delay(500);
Serial.print(".");
}
// when connected display connected and IP address on the network
Serial.println("");
Serial.println("WiFi connected.");
Serial.println("IP address: ");
Serial.println(WiFi.localIP());
server.begin(); // Start sever
}
int value = 0;
void loop (){
delay(1000);
WiFiClient client = server.available(); // listen for incoming clients
if (client) { // if you get a client,
Serial.println("New Client."); // print a message out the serial port
String currentLine = ""; // make a String to hold incoming data from the client
while (client.connected()) { // loop while the client's connected
if (client.available()) { // if there's bytes to read from the client,
char c = client.read(); // read a byte, then
Serial.write(c); // print it out the serial monitor
if (c == '\n') { // if the byte is a newline character
// if the current line is blank, you got two newline characters in a row.
// that's the end of the client HTTP request, so send a response:
if (currentLine.length() == 0) {
// HTTP headers always start with a response code (e.g. HTTP/1.1 200 OK)
// and a content-type so the client knows what's coming, then a blank line:
client.println("HTTP/1.1 200 OK");
client.println("Content-type:text/html");
client.println();
// the content of the HTTP response follows the header:
client.print("<title>Meat Temperature Webserver</title>");
client.print("<h3>Meat Temperature Probe</h3>");
client.print("<ul><li>Thermocouple Temperature : ");
client.print(String(tempC));
client.print(" Celcius</li>");
client.print(" ");
// create a look up table for cooking temperatures as I never remember them
client.print("<h3>Cooking Meat Temperatures</h3>");
client.print("<table>");
client.print("<tr>");
client.print("<th></th>");
client.print("<td><b>74oC </b></td>");
client.print("<td> Chicken, Turkey & Duck</td>");
client.print("</tr>");
client.print("<tr>");
client.print("<td>Rare</td>");
client.print("<td><b>52oC</b></td>");
client.print("<td> Beef, Lamb & Veal</td>");
client.print("</tr>");
client.print("<tr>");
client.print("<td>Medium</td>");
client.print("<td><b>60oC </b></td>");
client.print("<td> Beef, Lamb & Veal</td>");
client.print("</tr>");
client.print("<tr>");
client.print("<td>Well Done </td>");
client.print("<td><b>71oC </b></td>");
client.print("<td> Beef, Lamb & Veal</td>");
client.print("</tr>");
client.print("<tr>");
client.print("<td>Medium</td>");
client.print("<td><b>63oC </b></td>");
client.print("<td> Pork Roasts, Steaks & Chops</td>");
client.print("</tr>");
client.print("<tr>");
client.print("<td>Well Done </td>");
client.print("<td><b>71oC </b></td>");
client.print("<td> Pork Roasts, Steaks & Chops</td>");
client.print("</tr>");
client.print("<tr>");
client.print("<td></td>");
client.print("<td><b>60oC </b></td>");
client.print("<td> Fish</td>");
client.print("</tr>");
client.print("</table>");
// The HTTP response ends with another blank line:
client.println();
// break out of the while loop:
break;
} else { // if you got a newline, then clear currentLine:
currentLine = "";
}
} else if (c != '\r') { // if you got anything else but a carriage return character,
currentLine += c; // add it to the end of the currentLine
}
}
}
// close the connection:
client.stop();
Serial.println("Client Disconnected.");
}
// clear the display
display.clear();
// display.setTextAlignment(TEXT_ALIGN_RIGHT);
Serial.print("Junction=");
printTemperature(temp.readJunction(CELSIUS)); // get junction temp from MAX318555 i.e. ambient
Serial.print("Thermocouple=");
printTemperature(temp.readThermocouple(CELSIUS)); // get temp from k-type thermocouple probe attached to MAX318555
tempC =(temp.readThermocouple(CELSIUS));
Serial.println();
display.setColor(WHITE);
display.setTextAlignment(TEXT_ALIGN_CENTER);
display.setFont(ArialMT_Plain_24);
display.drawString(54, 15, String(tempC)); // Display temperature in celcius on the OLED display
display.drawString(100, 15, " oC");
// write the buffer to the display
display.display();
delay(1000);
}
// Print the temperature, or the type or fault
void printTemperature(double temperature) {
switch ((int) temperature) {
case FAULT_OPEN:
Serial.print("FAULT_OPEN");
break;
case FAULT_SHORT_GND:
Serial.print("FAULT_SHORT_GND");
break;
case FAULT_SHORT_VCC:
Serial.print("FAULT_SHORT_VCC");
break;
case NO_MAX31855:
Serial.print("NO_MAX31855");
break;
default:
Serial.print(temperature);
break;
}
Serial.print(" ");
}
******* CURRENT CODE ABOVE ********
use at own risk software still needs a few tweaks will post update when its all done.
After further testing it does seem to have a habit of overheating and the esp8266 on the board locks up. So will be redoing this with a esp8266 and a i2c display rather than the webmos version above. The webmos is also very limited on available pins.
I have used the ESP8266 on the oven measurement it self see the other article.
From the first firings of the oven and using no temperature measurement, but instead is it cooked to, oh no its burning.
Moved on to using a cheap and cheerful infra red thermometer. Which was good for pizza and getting a good idea of the overall temperature of the oven.
Last year I bought a Weber instant read thermometer so I can monitor inside a cooking joint. Which was a revelation, getting up at 4am Christmas morning, I opened the door on the wood fired oven and plunged the thermometer into the gammon. It read at a perfect cooked temperature, put cooked gammon in kitchen and went back to bed. No more uncovering the gammon cutting into it to see if it was cooked, recovering putting back in the oven. Only to check again later.
It is so much easier to keep an eye on when cooking a joint of meat. Well worth the spend and we use it in the kitchen as much as with the wood fired oven.


Comments
Post a Comment